
A while ago when I was in a bad time in my life I was told about the concept of a happy box. You take pictures of everything that makes you happy and put them in a box and then when you’re down you have something to look at to remind you of the good things. I like this idea, but a box of pictures never felt like me – so I made a miniature room and filled it with the things I like in miniature. I call it the happy house.
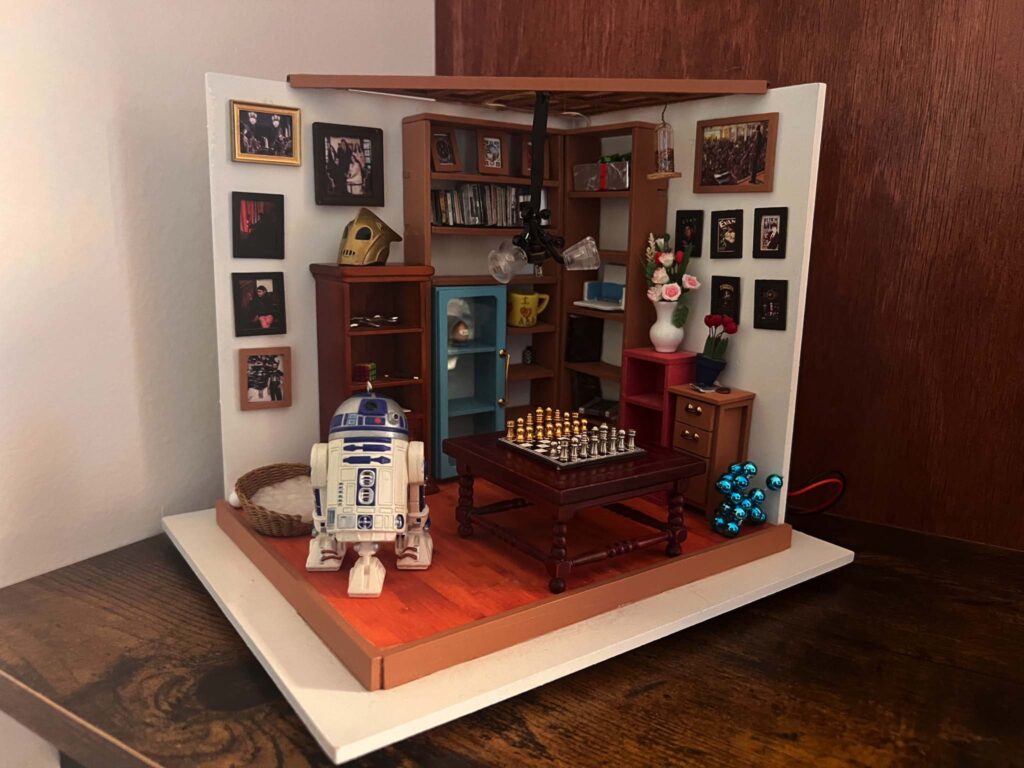
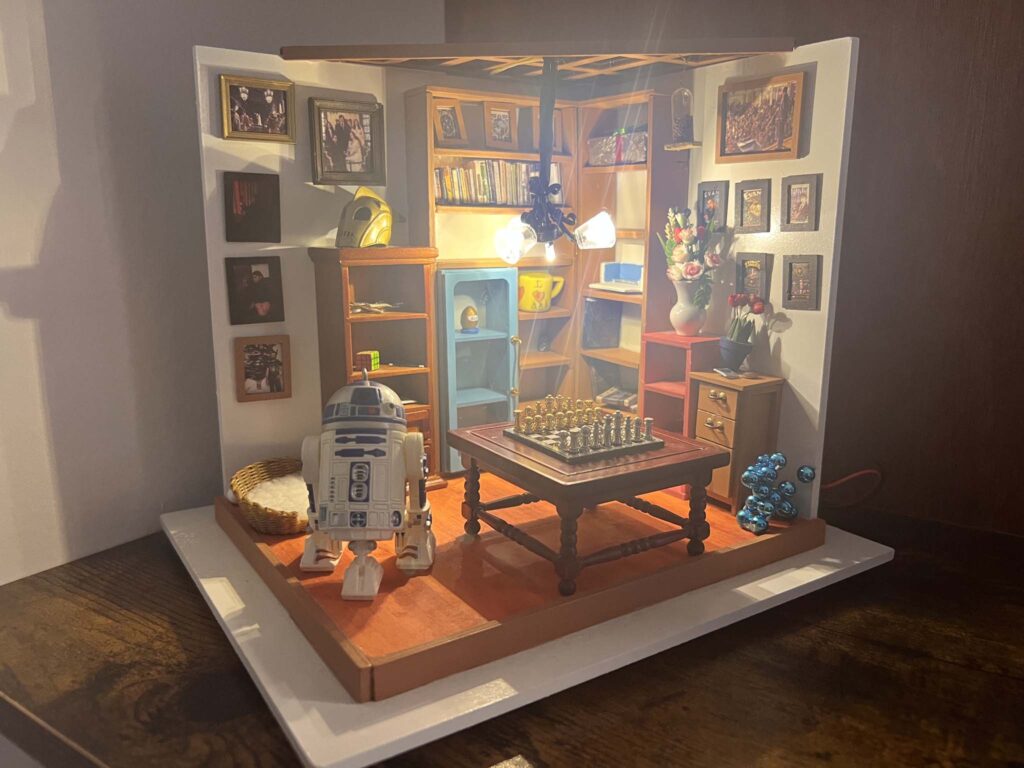
And yes it DOES have to have working lights, why do you ask?
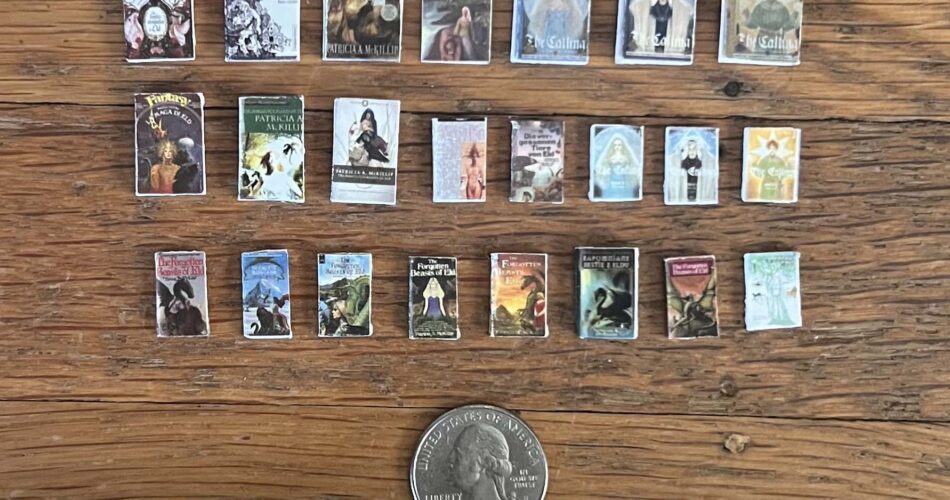
So it has some Rocketeer things, a R2-D2 figure to match the life sized R2 I built, etc. But I love the book the Forgotten Beasts of Eld. A while ago I started trying to find it in different languages and covers, and now I have a lot of those – so I decided I wanted to put miniature books of them in there too.
But the people that make miniature books just disappointed me. They are mostly covers over a little foam bit, or maybe some blank paper accordion folded into pages. INACCEPTABLE. I wanted actual book pages just for a start – and if I accordion folded a strip of paper into pages I would only end up with half the number of book pages I could have, because each page would be doubled due to the accordion fold,
I therefore set out to make a miniature book. This guide is how to make a miniature book if you are a bit obsessive. This guide is not at all useful in any real way to most anyone else, because everyone else makes little foam blocks with a cover on them and seems happy about the results.
This guide will result in a book with actual printed pages. It looks exactly the same on the shelf, really, but … I would know when I looked at them that they were complete fakes, and it would leave the happy house with a hollow rotten core that would RUIN EVERYTHING.
But seriously, when I make stuff like this going overboard is kind of fun for me. And so is working on a process to make this repeatable.
So! Step 1! Scan in about 40 pages of the book! Get the title page, and a nice selective sample. You can’t do the whole book because it would be far too thick – but about 40 pages works for a hardback, about 30 for a paperback (because yes, the books DO have to be scaled proportionally, why do you ask?)
Now you might think fine, just print the pages, stack them together, done. I wish. First, printing double sided is harder than you expect – printers aren’t designed to ACCURATELY print double sided. At this scale, being a millimeter off is significant – and that is difficult. Secondly if you cut pages at this size, you can’t just tap the sides and have them neatly stack up. They just don’t square up. The friction of sliding the pages is greater than the weight of the page – so trying to square up little tiny book pages just doesn’t work.
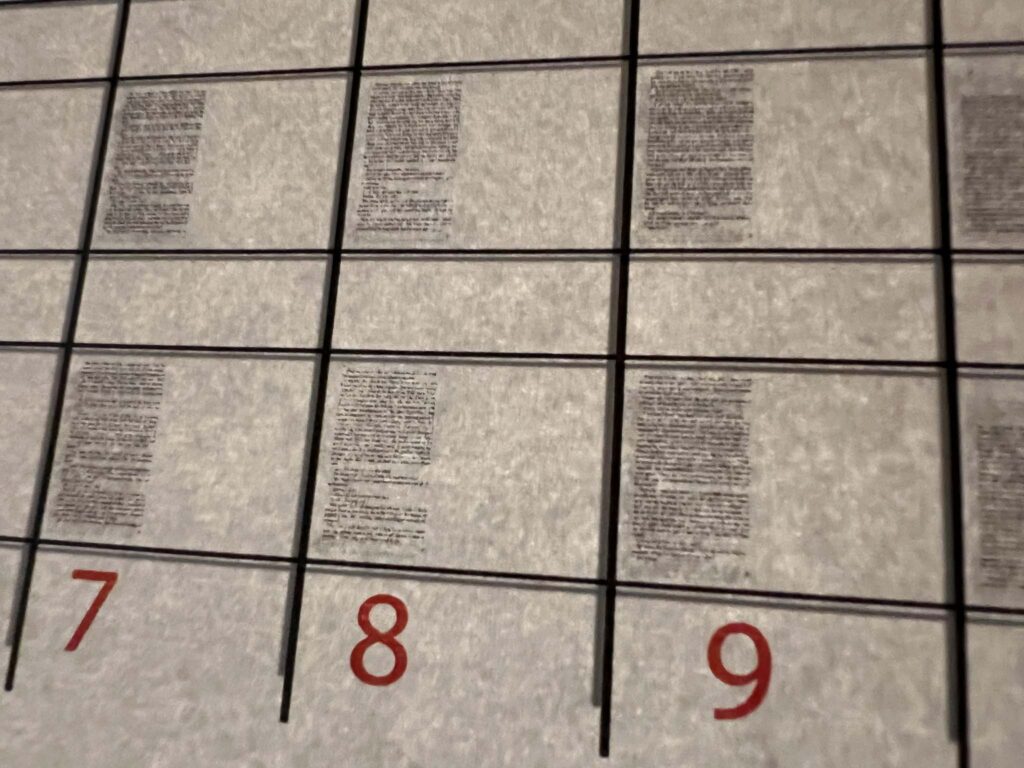
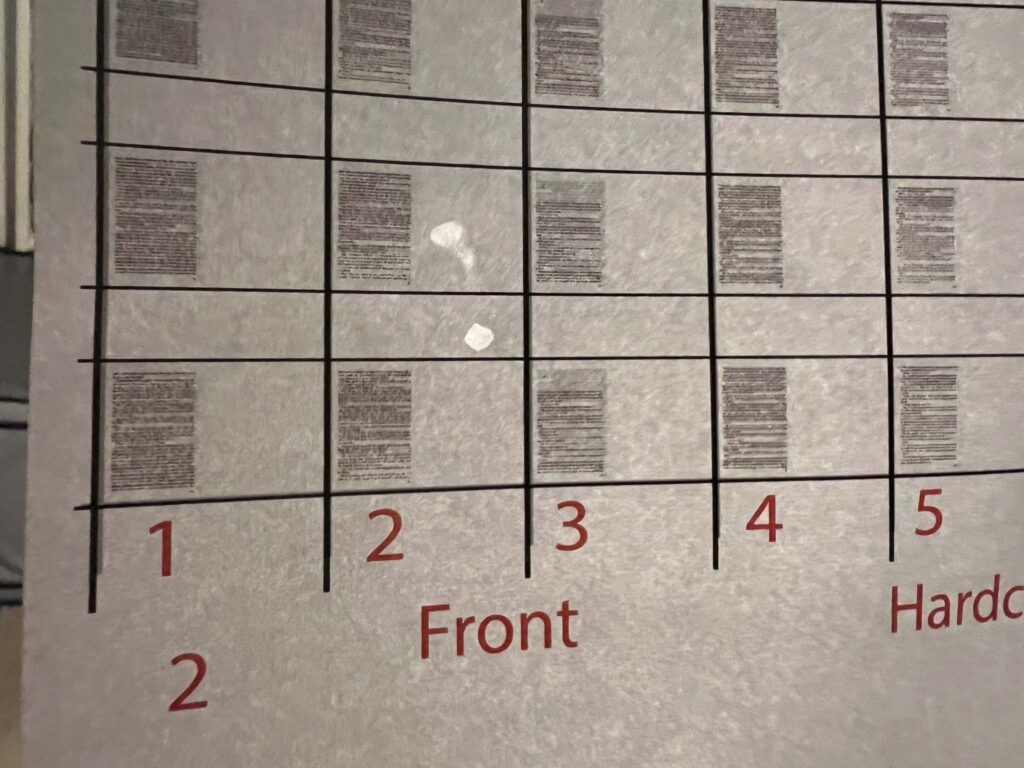
I created a psd in Photoshop Elements – download it here. It consists of three rows of ten pages each. The three rows are the same – so if you print this out, you get three books, not one. If you open the file you’ll see this:
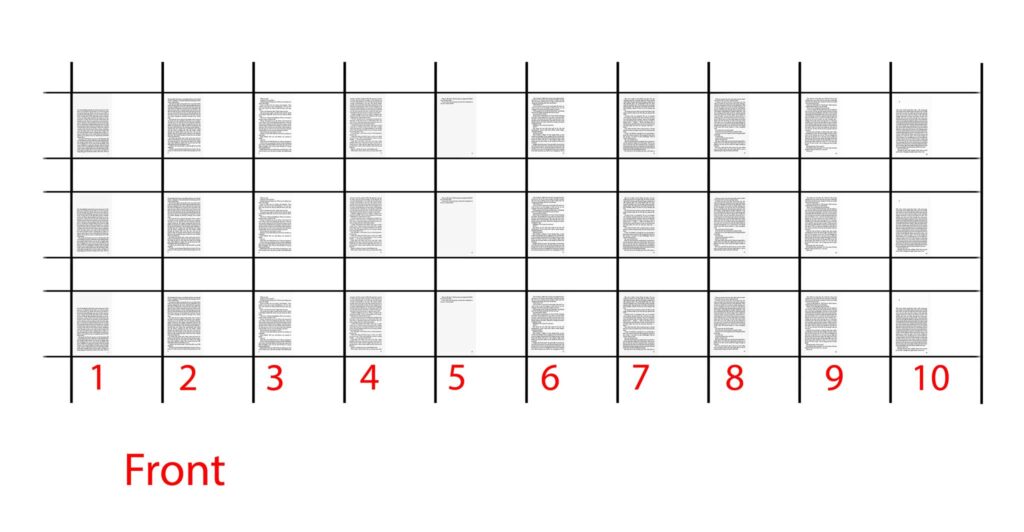
But if you look at the layers, you will see five sets of layers!
One layer is the title page. There is also Set 1 Front and Set 1 back, and Set 2 Front and Set 2 Back. And each of those sets is broken down into the three rows.
So to print this out, you just have to print the title page. Then print Set 1 Front on one side of a sheet of paper, and Set 1 Back on the other side, and then repeat that for Set 2. And now you have all the pages for three books!
Except it is never quite so simple.
The reason for the layers is to make sure that everything is lined up exactly with everything else. And the pages are centered exactly, so if you print a sheet and then flip it, the other side will print EXACTLY behind so that everything is all lined up. But of course, printers aren’t designed to do that. So it just won’t work without fiddling.
So print out a set, and flip the page and just print the same set again (they all print in the same places, so you don’t need to change anything.) Then hold the paper up to the light and see if the black lines are lined up or not. Then move the pages half of the amount needed to get them to line up (if you move it half the distance, then the front side goes half and the back side goes half, making up the entire distance) and try again. And again, and again, until it is exact. Here’s a sample print held to the light so that you can see what I mean.
Note that this might also make you rotate the image a little bit – my printer USED to print things square, but after several years of use I had to rotate the image by .14 degrees to get it to line up. (The linked psd is not rotated.) And if I printed out five sheets, two of them would be right and the rest wouldn’t be – it just didn’t feed the paper that accurately.
And worse! It sometimes would distort one side of the print, so some bars would be exact and some wouldn’t be! CATASTROPHE!
Lines 2 and 5 are lined up – 1, 3, and 4 aren’t. I think the rollers in the printer just didn’t roll at an exact speed so that the page got distorted. Usually not something you’d ever notice – but usually who would ever do anything like THIS?!
When the printer was new these weren’t issues. But as the printer gets older apparently things get less exact. The printer just wouldn’t place things in exactly the same spot each time!
But finally in the end this will give you sheets for the book. You can scale the size up or down – hardbacks need to be larger and maybe a bit wider, so you might have to stretch it horizontally a bit. I ended up with three sizes, corresponding to hardback, paperback, and bunko editions.
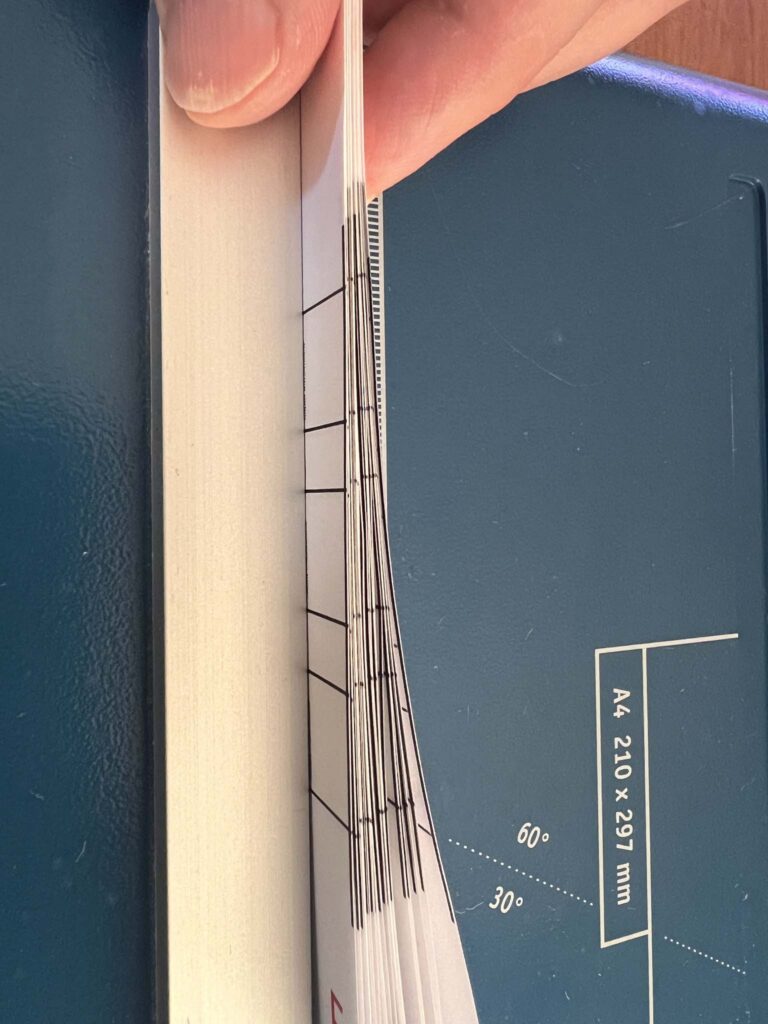
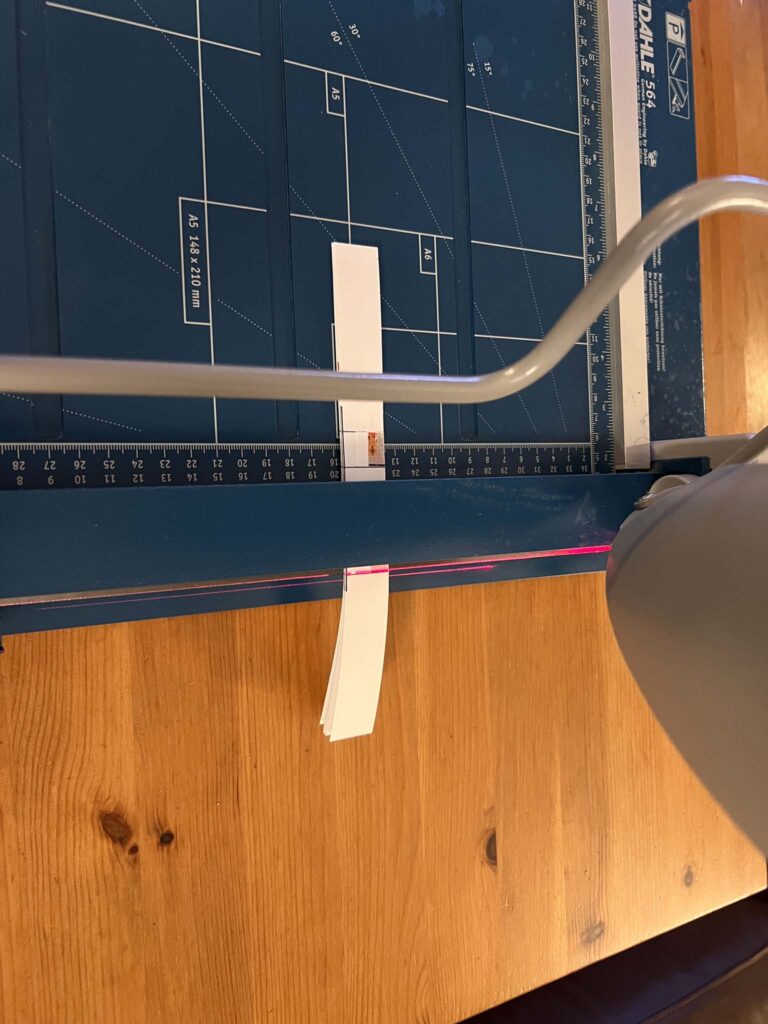
So what do you do with these sheets? Well, you’ll need a guillotine cutter. Ideally with a clamp.
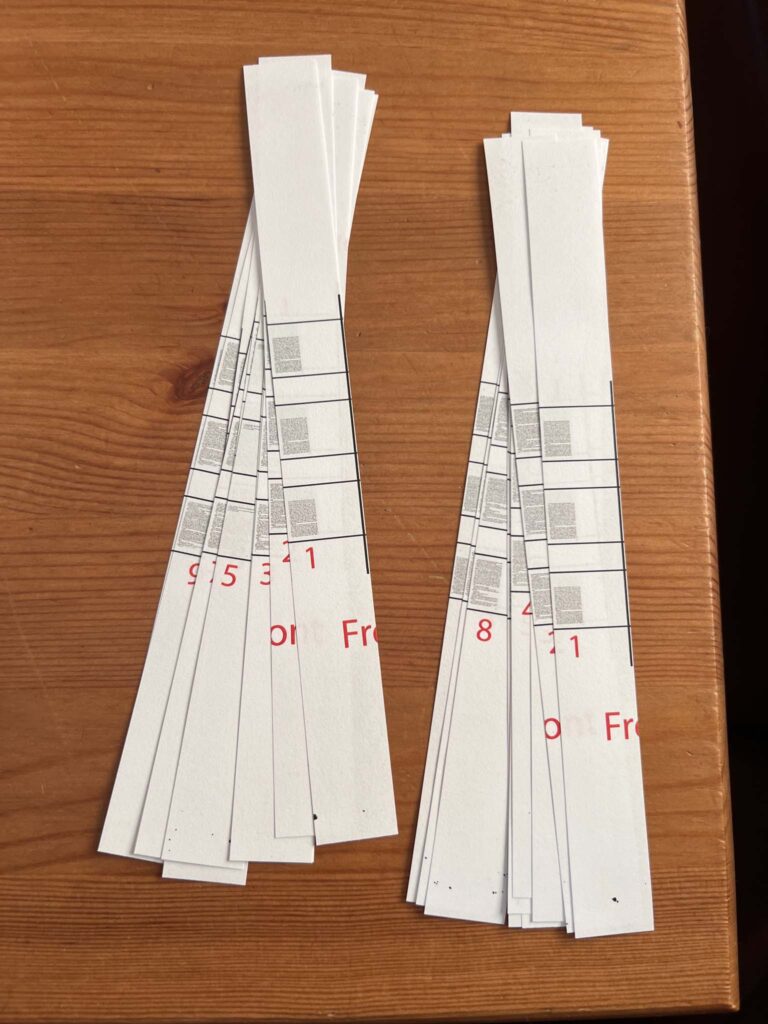
The problem is that if you cut out the pages, they are just too small. You can’t square them up, for example – you can tap the sides but friction will just hold them wherever they coalesced, and it is difficult to do anything. So this assembles things in strips that you can handle, then cuts those out.
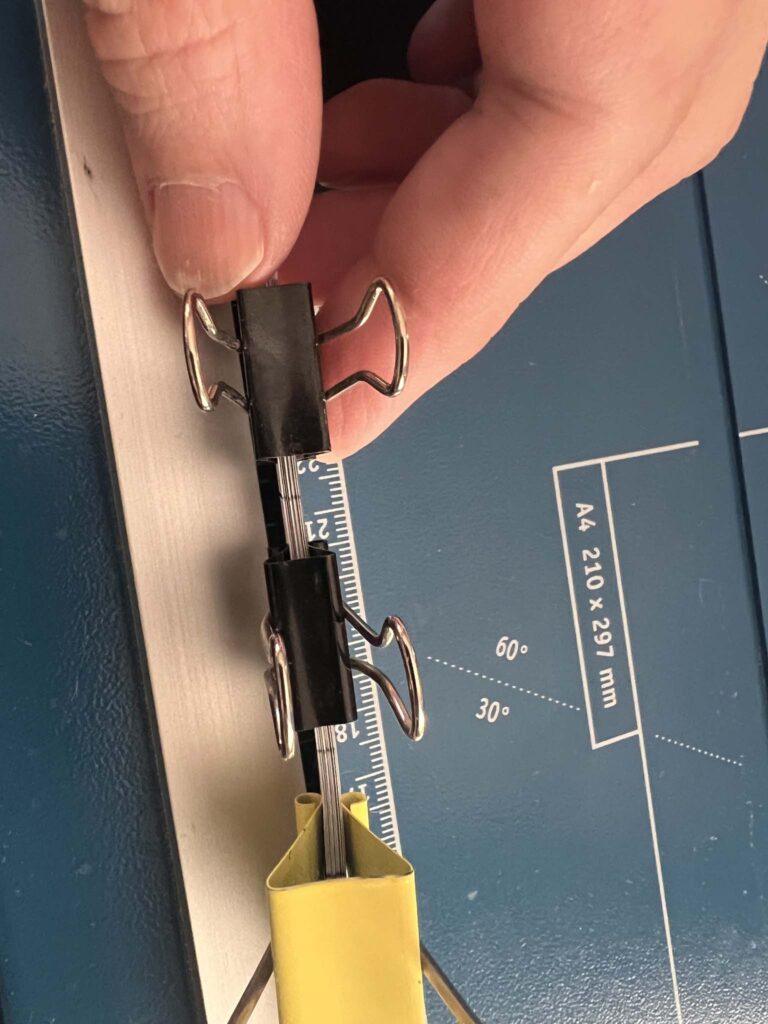
So first – cut each page into strips. Cut pages across the narrow side so that you and up with three identical pages cut across the left side. This is why the red page numbers exist – you can easily tell which order to assemble the strips in after they are cut out.

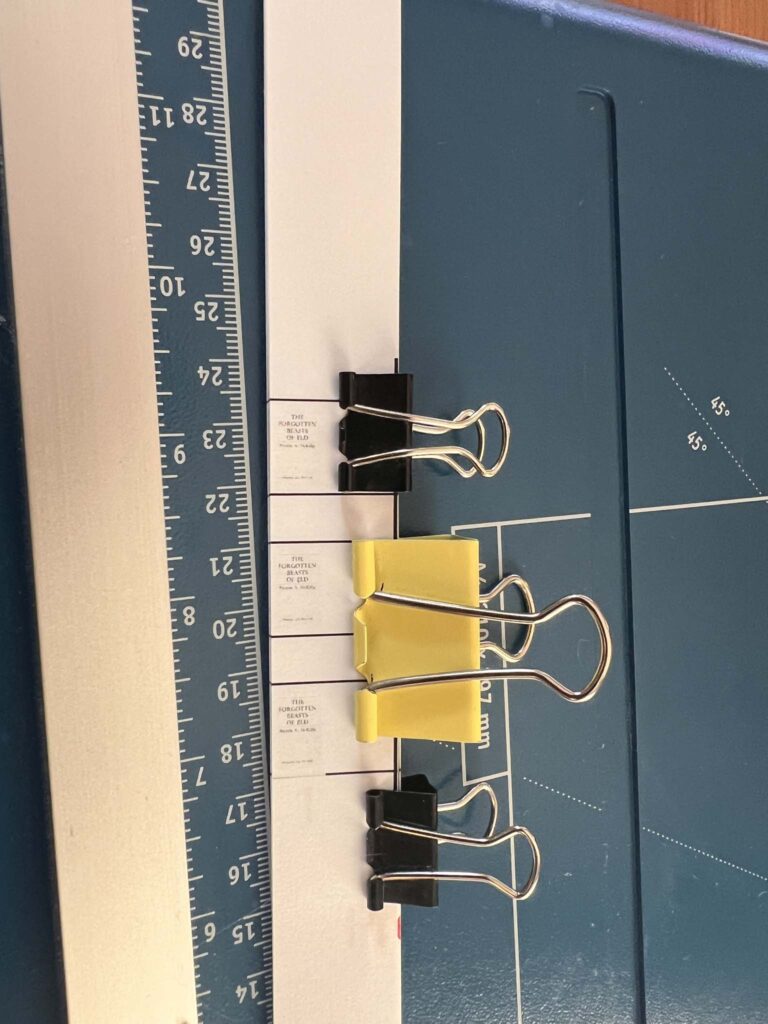
Stack the strips up so that you have basically the coverless book – cover page on top, then page 1, etc. The side strips help you see where exactly the pages are, so that you can get everything lined up. Line them up as exactly as you can!! Then use clips to lock everything in.
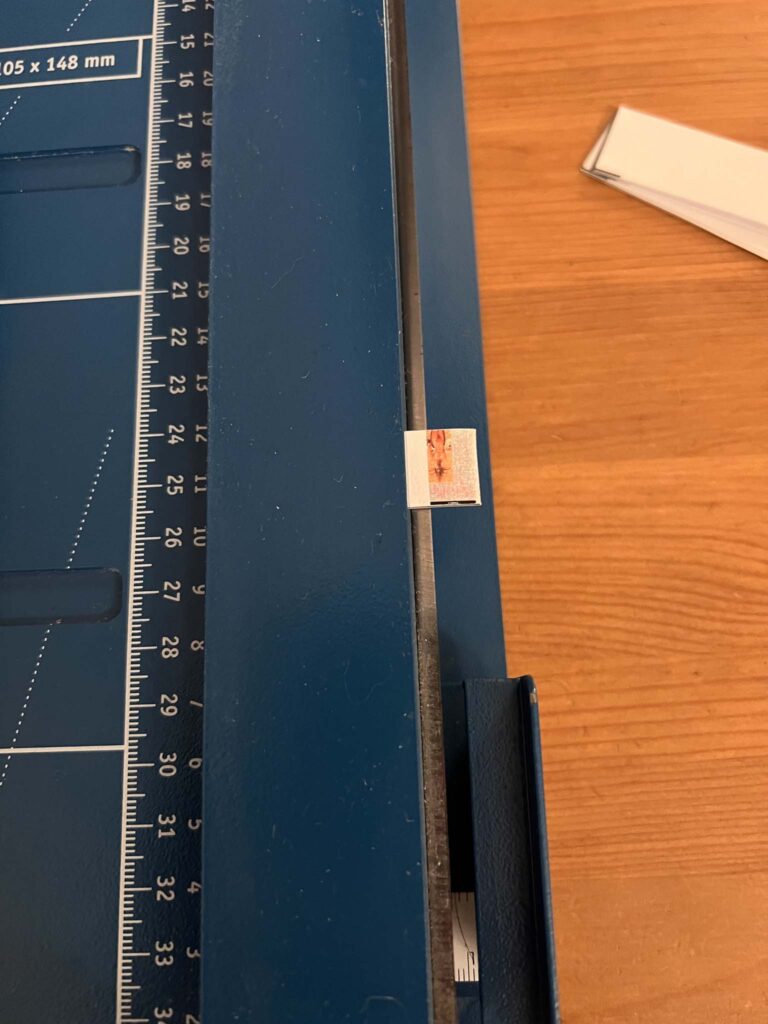
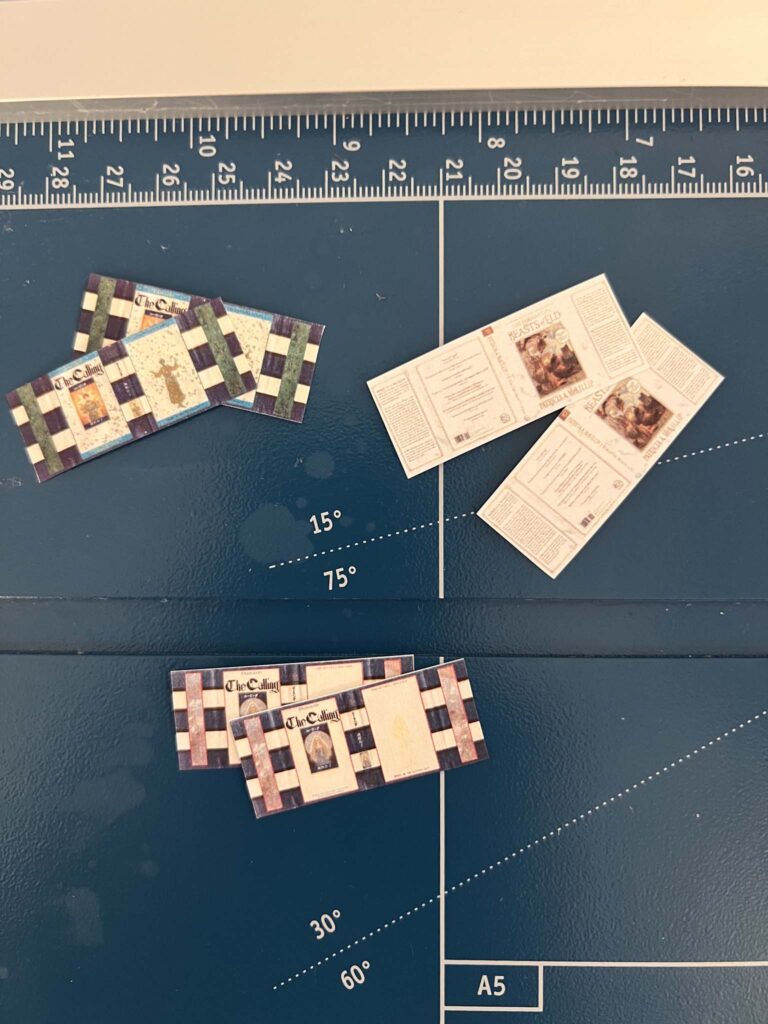
Cut the covers out. Bend the covers in the appropriate place. If you have a book that is too thick for the spine you might have to lose a few pages. Once things are sized up nicely, put some glue on the side of the paper strip and press the cover on. I tend to rub the glue a bit on the clipped strips to ensure it gets to every page.
You can use any glue that works for paper. There is glue for book binding, I’ve been using that lately.
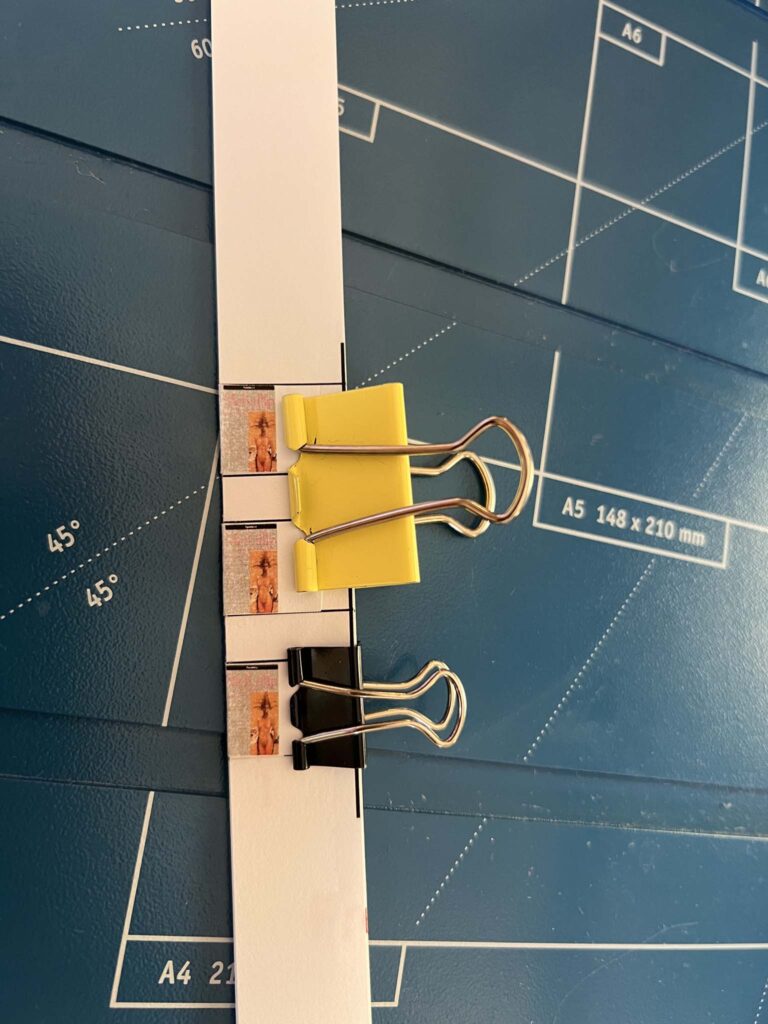
Wait for the glue to dry, then use your guillotine cutter to cut the final sides of the book!
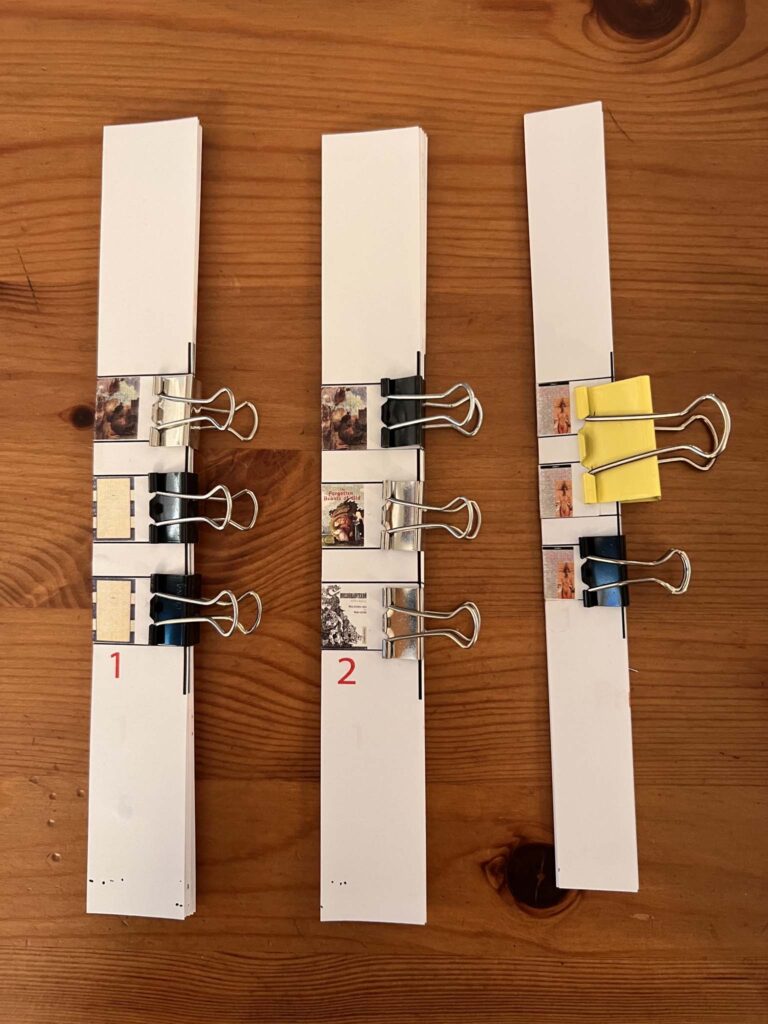
One important thing – it is easy to get things wrong, to have a cover askew, or to cut a book and be displeased with it. I came up with this process to let me make batches of books. Once you get things printing correctly, the rest is fairly fast to do. So don’t try to make one book – make several. Then you can make mistakes and be fine, and it just isn’t much extra work.
If you want to add a dust jacket for a hard cover book, just print one out and fold it over the book cover.
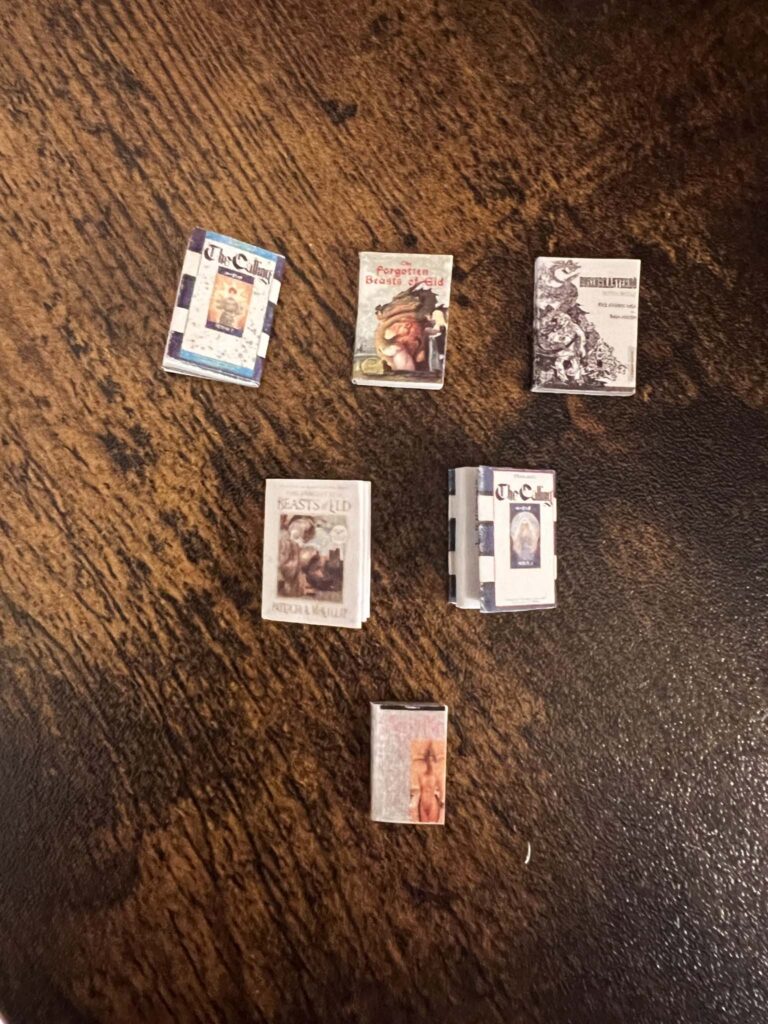
Here are all the editions I have of the Forgotten Beasts of Eld with their matching miniatures:
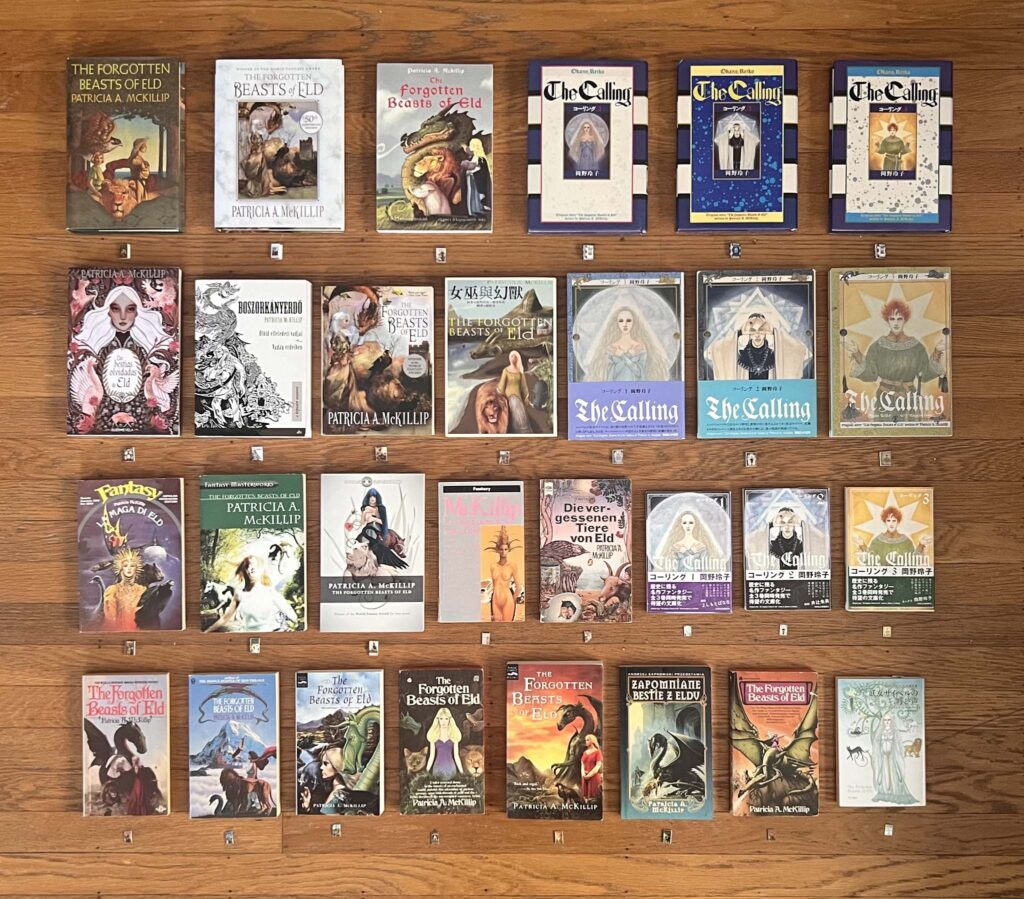
And here are just the miniatures!
For a labor of love, it’s a fun project. You end up with a much more impressive book than any other method out there.
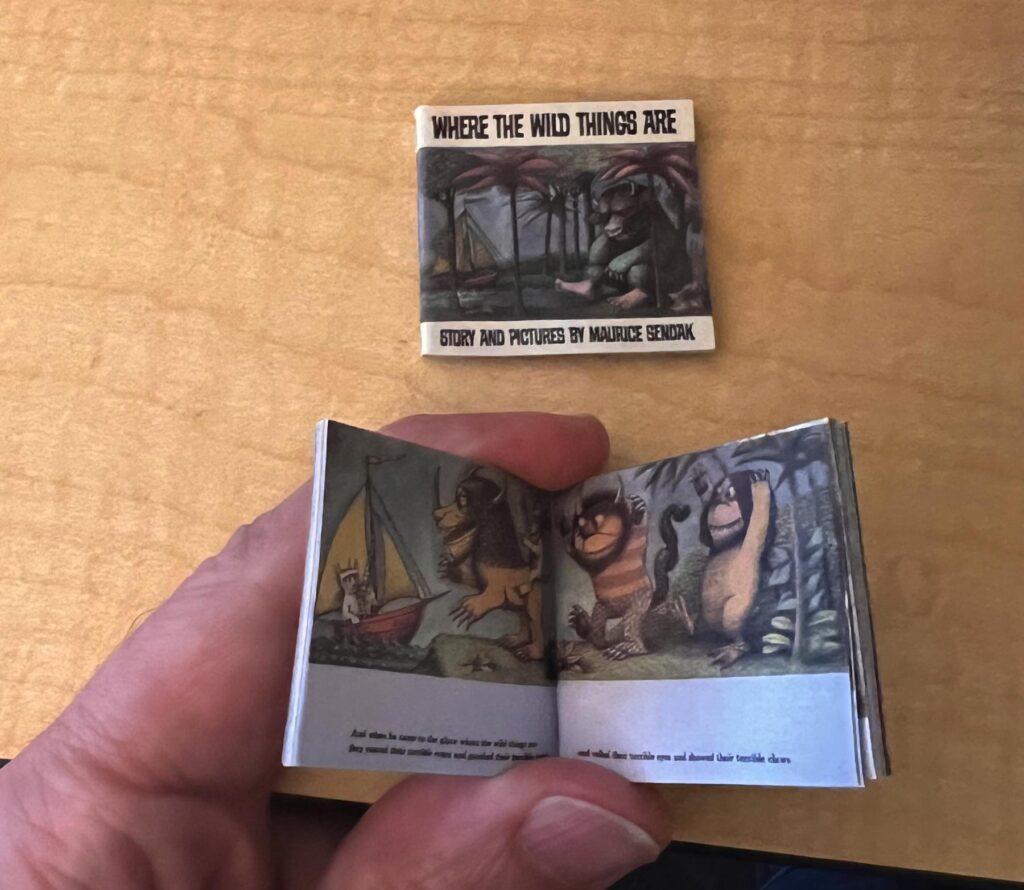
And if you find the right book and make this a little larger, you can get a fully usable book – Where The Wild Things Are came out really cool when done at about an inch, it is fully readable, just small!
If you do anything with this, let me know, I’d love to see!