

You bring in dependencies, they bring in more dependencies – so how does maven decide which dependencies to bring in if there conflicts? This usually happens if two dependencies you add bring in libraries at different versions. This happens a lot, and if the versions are compatible with each other then you usually just don’t notice. But the first important thing to understand is how Maven is doing this.
If you declare a dependency it’s easy. Maven uses the version you declare. Transitive dependencies are the difficult ones – the dependencies brought in indirectly.
Maven resolves dependencies by picking the dependency closest to your project. If your project depends on project B, project B depends on project C, and project C depends on project D version 1, you get project D version 1.
A -> B -> C -> Dv1
But if you add a dependency on project E which depends on project D version 2, you now will get project D version 2 as that is closer to your project.
A -> B -> C -> Dv1
E -> Dv2
Resolution: Dv2
If you then include a dependency on artifact D version 3, it will include artifact D version 3 as that is the closest.A -> B -> C -> Dv1
E -> Dv2
Dv3
Resolution: Dv3
An edge case is if two versions are at the same transitive depth:A->Dv1
B->Dv2
In this case, the first one wins – so if A is first in your pom, you will get Dv1. If B is first in your pom, you will get Dv2.
See Maven documentation for more information: https://maven.apache.org/guides/introduction/introduction-to-dependency-mechanism.html
The problem here usually comes in when you add or update a dependency. Most of the time it works just fine. But once in a while not so much.

It seems so easy … you want to update your dependencies. Maven even makes it easy, this command shows you all dependencies that have an update available and what the latest version is:
mvn versions:display-dependency-updates
And this command does the same for plugins:
mvn versions:display-plugin-updates
So how can I tell what is being bought in?
My goto command is
mvn dependency:tree -Ddetail=true
This shows you a tree of dependencies and what they bring in.
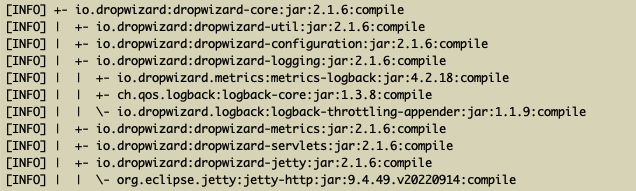
This shows that we are using Dropwizard-core version 2.1.6. It is bringing in Dropwizard-Util, etc. Note the nesting – so for example, dropwizard-core brings in dropwizard-logging, and that brings in metrics-logback.
This does show a pruned list – if a lower level artifact is included higher in the tree then this won’t show it. You can get a full list with:
mvn dependency:tree -Ddetail=true -Dverbose=true
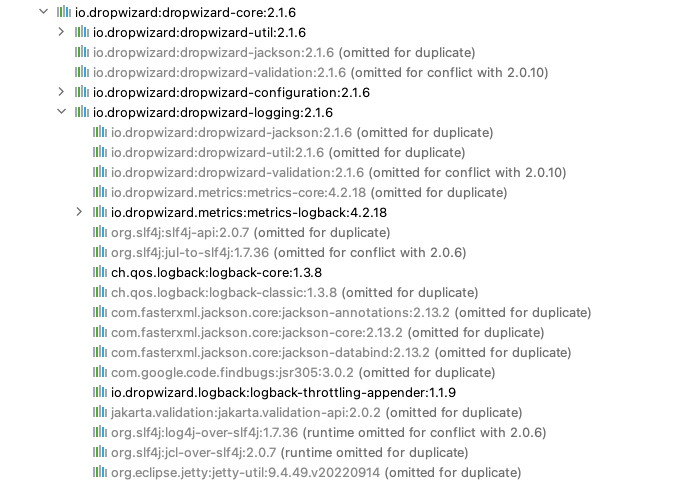
This output is the same as above, but with the verbose flag set:

You can see something similar in IntelliJ. Go to view->tool windows->Maven. In the Maven tool window, browse to your project and pick “dependencies”. You will see the same information as the verbose output of Maven:
The maven command above is using the Dependency plugin, which exists to help you figure out dependency issues: https://maven.apache.org/plugins/maven-dependency-plugin/
(mvn dependency:resolve is also very useful, it will show how all dependencies resolve.)
Effective Poms
Your pom might have a parent pom, it might have a parent pom, etc. It can be difficult to even know what versions of things are being imported!
You can see what is known as an “effective pom”, which is essentially the pom and every parent all mixed together, also with resolved profiles and any other relevant setting.
From the commandline you can see the effective pom by running:mvn help:effective-pom
I prefer seeing it in IntelliJ, right click a pom file and choose Maven->Show Effective Pom and it’ll show up in a new tab.
Generating an effective pom with and without a change and then doing a diff on them can be very helpful – though for dependency issues it is usually helpful when you change to a more recent parent pom and then find things breaking.
Everything resolves, so what’s the problem?
Not every version of a library is compatible with other versions. A call might have one parameter in version one, but two parameters in version 2. Or they might have changed a namespace. Or anything else that means the version of the library abruptly becomes quite important.
The break is not apparent, you do not get a clear error message saying that you have incompatible library versions. Quite often everything will build, and all unit tests will run – but then if you try to start the service it won’t start. The worst case is sometimes it will start, but eventually you will do something that triggers a call to the incompatible library which fails.
Example error messages are hard to give as they are fairly random. “No Such Method” types of errors are common – if the calls to the library changed then calls to the wrong version will give you this error. In general, if you see error messages around calls in a library you aren’t familiar with and didn’t call, then that’s a clue. Googling error messages will often tell you it’s a library mismatch. And sometimes you get a random error and honestly the best thing to do is if you wonder, then remove all your code changes and try running code with just the updated dependencies and see what happens.
If you see exceptions like these you should be suspicious of a dependency issue:
- java.lang.NoSuchMethodError
- java.lang.NoSuchMethodException
- java.lang.NoSuchFieldError
- java.lang.ClassNotFoundException
- java.lang.NoClassDefFoundError
To really prove that dependency updates are safe you will need to not only run your unit and integration tests, but actually bring up the service. I have frequently seen dependency upgrades pass all tests, but cause a service to be unable to start.
Finding the Dependency To Fix
If you have doubts about your dependencies the first step is to isolate the changes. Remove the code changes and just update the pom.This lets you know for sure that the issue is a dependency, and not a code change.
Now find the pom change that caused the issue. Ideally just apply each pom change one at a time and see if the issue replicates. There might be more than one pom change causing an issue – so you do need to test them all. Honestly I usually do a binary search – put in half the changes and if things work then put in half of the remaining changes and continue.
This should give you the dependency that is causing the problem, but not which transitive dependency is the actual issue. To find that, remember the command from above:
mvn dependency:tree -Ddetail=true -Dverbose=true
Remove the problematic change, and run that command, dumping the output into a file:
mvn dependency:tree -Ddetail=true -Dverbose=true > pre
Replace the change and run that command again, dumping the output into another file:
mvn dependency:tree -Ddetail=true -Dverbose=true > post
Now run a diff on the pre and post files. That will show you every library that changed – and now you have a list of suspects.
Sometimes that’s enough and you can figure it out from there (take a few tries using excludes in the pom file and see!)
If not, then you might need to find out for sure exactly what is happening in what library. To do that, run the code in IntelliJ and replicate the issue – ideally from a unit test as that’s simpler to bring up, but if you have to run the service then go ahead. Then look at the callstack that failed, and set a breakpoint in it.
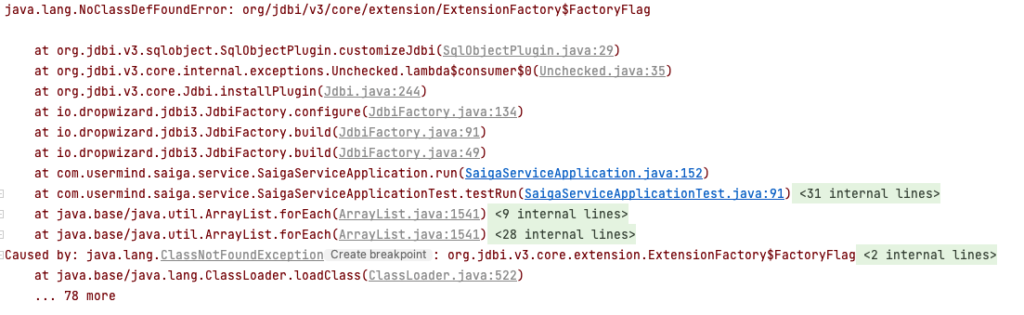
Set a breakpoint in that callstack – I usually start with the lowest spot in the codebase (so com.usermind.saiga in the stack above) but often will go lower as well if needed. When I step into the library called from Saiga, look at the project window in IntelliJ:
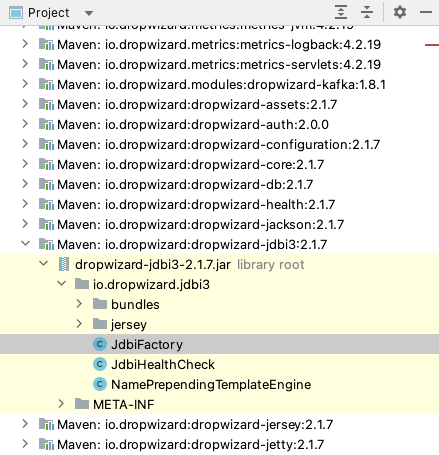
That shows me I stepped into Dropwizard-jdbi3 version 2.1.7. Now I can step into that library and just step over lines until something blows up. Next time I will step into the line of code that blew up and repeat. The goal here is watching the project window to the left to see what libraries and versions it is stepping into – that helps me build a picture of what exactly is happening. You will need to write down what is happening with both libraries and versions – because the next step is to revert the code so no dependencies are updated and do the same thing. This gives you a comparison of what libraries it went into when it was working, and what libraries it went into when it failed.
When you do this there are two things to look for – what library versions do you step into that changed? And also – did the behavior change? If so, why?
This isn’t something I have to do often, but occasionally it can really help – so don’t be afraid to step into third party code!
The Toolkit
So you have theories about where the conflict is – so then what?
The maven dependency commands above will show you which libraries are being pulled in. If you see library A is pulling in library C at version 1, and library B is pulling in library C at version 2 and there is a conflict, try the following steps in order, stopping when the issue resolves.
IMPORTANT NOTE
If you are testing in IntelliJ, don’t forget to tell it to reimport the Maven project each time after you make pom changes!
Step 1: Best Path (but you have to get a little lucky)
Update both libraries A and B to the latest. If you are lucky they will both have updated their dependencies and the problem goes away. This is the best solution, and will often work.
(Note that “mvn versions:display-dependency-updates” will show you which dependencies can be updated and what the latest version is. “mvn versions:display-plugin-updates” does the same for plugins.)
Step 2: Exclude the dependent version you don’t want
In the example, let’s decide we want library C version 2. We can go to dependency A and tell Maven to ignore its version of library C. Maven will then choose from the other options, which in this case is from library B’s dependencies. Note that if multiple libraries bring in library C version 1, we will have to add an exclusion to each of them.
  <dependency>
    <groupId>io.dropwizard</groupId>
    <artifactId>dropwizard-jersey</artifactId>
    <exclusions>
      <exclusion>
        <groupId>commons-logging</groupId>
        <artifactId>commons-logging</artifactId>
      </exclusion>
      <exclusion>
        <groupId>ch.qos.logback</groupId>
        <artifactId>*</artifactId>
      </exclusion>
    </exclusions>
  </dependency>
The first exclusion is to not bring in the commons-logging dependency. But notice the artifact in the second exclusion – it’s a wildcard. That will tell Maven not to bring in any libraries from ch.qos.logback. That is sometimes much simpler than listing out multiple exclusions.
Step 3: Pick equivalent releases
If both of those approaches fail, go to the central Maven Repository at https://mvnrepository.com/ and look at libraries A and B. If Library A was last updated one month ago but Library B was last updated one year ago, try using a version of Library A from one year ago. Look at the dependency output and see if they line up. You can see if things work and you can also try varying versions of libraries A and B to see if you can get ones that are compatible with each other.
I have had to do this when there are very closely interconnected dependencies. And I have only had to do this a very few times.
Step Never: You can include library C yourself at the desired version. Since you included it, it’ll just work! Right? Well … as long as you picked the right version, sure. I called it step Never because ideally you want to let libraries handle their own dependencies – and now you’ve inserted yourself into that path. So if you update library A you will need to remember to update library C to match.This will cause you major headaches next year when you upgrade library A but have no recollection about Library C. Plus you’re just adding junk into your pom to maintain. So yeah, it’s something you can do, but it isn’t a great way to resolve the issue.
BIG NOTE
This is never easy. I will often keep making changes and excluding libraries and just trying things until I get something that works – if it’s a minor conflict then no big deal, but wait until you have four libraries that all have to be at equivalent versions and all of which bring in a set of conflicting dependencies …
So when I get something working, sometimes there is a mess. Most likely the last change is the one that worked, so go back and start rolling out the prior changes. If it didn’t help, then it shouldn’t get checked in. Just pick a set of changes, comment them out, and test. If things still work, but another set of changes and repeat. Just don’t check in all the false paths you tried, it’s just adding more complications that will cause you a headache later!
Conclusions
This is more of an art than a science, unfortunately. Find the minimal change set to go from a good state to a broken state, and then either update dependencies to compatible versions or exclude transitive dependencies until things work. The trick is figuring out what changes to make, and that is often just not easy!